
I love Idle Iktah. Here's 43 tips, and 3 mini-guides ⏳
I have been playing Idle Iktah almost obsessively for the last 6 weeks, and have finally reached all 99s and almost 100% completion! In this post, I’ll answer common questions from the Discord, reveal plenty of gameplay tips, and include a small collection of mini-guides. Enjoy!
Note that Idle Iktah is constantly being updated, so there’s plenty of new content since this article was posted (November 2023).
Improvements / suggestions for this post are very much welcomed, feel free to leave a comment or raise a PR directly and I’ll include them. Mouseover / tap to the left of a header if you want a direct link to share.
You might also find @siofreed’s data spreadsheet (from Discord) useful, it contains tons of extremely useful information on drop tables, recipes, pets, and trading. Searching this for any item is a great way to find out where it comes from and what it is used for, although it is sometimes out of date.
Idle Iktah is available on iOS and available on Android, I play on Android.
FAQs
On the Discord, there are a lot of players who join and ask the same few questions. Hopefully by answering them here, players will be able to Google for answers instead!
Special thanks to the other players on Discord who helped me when I was first figuring out some of the game’s mechanics.
Items
1. Where do I get Gold recipes?
This is probably the most confusing part of the entire game! The recipes can be earned by:
- Collecting “Woodland Art” as rare drops in “The Hidden Grove” combat area. Clarifying potions (from alchemy) can then be used on these to randomly obtain the recipes, or junk items (shopping lists, cow poems, etc).
- As rare drops from all enemies in the medium/high levelled “Aurum Arrangement” combat area. Note that only the “Aurum Lord” drops the Gold Body instructions (as well as all others), so should be farmed if possible.
2. How do I make a copper dagger?
If an instruction is missed during the tutorial, it’s easy to not understand the UI!
Here’s @micksnips2’s (on Discord) instructions:
Mine some copper ore and chop some hemlock. Using the smithing skill, you can turn the ore into a bar and then turn the bar into a copper dagger. Make sure that you’ve selected the hemlock as the source of fuel (top left) on the smithing screen.
3. Where do I get Cod?
Confusingly, Cod cannot be fished. Instead it can be earned by:
- Purchased from the trader “Lerico”, the fish salesman.
- As a common drop from killing the medium/high levelled “Aurum Peon” in the “Aurum Arrangement” combat area.
4. Where do I get Sasquatch Fur?
In “The Deep Forest” combat area, a Sasquatch will very rarely spawn. This Sasquatch drops Sasquatch Fur 100% of the time.
Note that this is an extremely rare spawn, and it took me ~6 hours of combat to obtain it.
I’ve heard a rumour that Rose Tinted Goggles from “The Four Hatsmen” combat zone helps, but I haven’t tried using them.
5. Where do I get Rare Shells?
Essentially by selling things without any other use.
For example, using pickaxe heads to make pickaxes provides great XP, and they are usually worth quite a lot. Similarly, if you’ve levelled a skill overnight you may end up with more lower-level resources than you need.
In general you won’t need to spend too many rare shells early on, and you can likely use items for more direct purposes. This is especially true for rare items, use them for skills or save for later if you can. Monster drops can also be a good source of high value items.
Rare shells can also be obtained from shellfish.
6. Where do I get lots of Feathers?
By fighting in “The Deep Forest” and killing a lot of ducks!
7. Where do I get Pearls?
Pearls are one of the rarest non-combat drops in the game, found in just 1/1000 shellfish opens. Shellfish can be caught by:
- Ocean fishing, if you have the “Otto” pet.
- Gathering at “Pechugh Bay” (unlocked by completing Library tier 1 in Community, speed depends on time of day).
Whilst opening shellfish, make sure you are using the ring that doubles gem drops. I think it works to double pearl drops. There are a few other rare places to obtain pearls (e.g. Pirate chest), but since you need 10 for a quest these aren’t reliable enough.
There is also a very rare (1/100,000 chance) “black pearl”, good luck finding it!
8. What weapon / equipment should I use?
It depends what you’re trying to do. For most of the game, the simple answer is “the best equipment you can smith”.
Later on, if you are low on food you’ll want to use higher defense armour. If you’re grinding for XP against weaker enemies, you’ll want to prioritise attack and strength, with defense not really mattering.
The alchemist’s mask (rare drop from Tamah Shaman in the “Tamah Tribesmen” combat area) is extremely powerful if you’re using combat potions, as it doubles their impact.
9. What enchants should I use?
The game is pretty limited in terms of enchants, but I found a few that were super useful. Namely, the “double alchemy ingredients” glove enchant, and the “spices provide extra attack” helmet enchant.
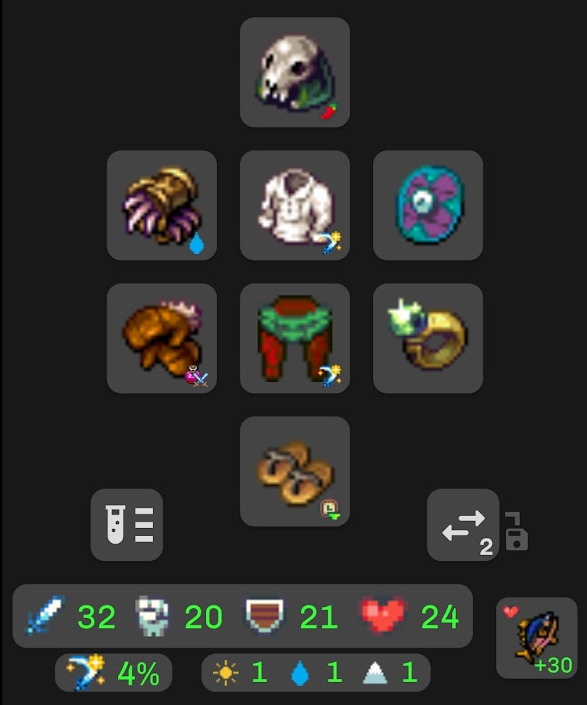
Here’s the equipment & enchants I used for getting to 99, maximising attack and strength. Note that I’m intentionally missing a forest protection enchant so forest enemies (in The Hidden Grove) have more health.
Features
10. How do I put things in my house?
- Open up the House menu.
- Long press an equipped bag or box.
- Drag this into an empty slot in the house.
- You can now tap a bag to open it, then drag and drop between bags / boxes.
11. How do I unlock Expedition’s Echo?
“Captain Izzy” in the “Expedition’s End” combat zone drops a “Wavesong Key”. Using this in the inventory drops the Expedition’s Echo minigame.
12. How do I beat the Bear game?
The Bear game is found in the bottom right “More” menu, with the bear icon. Your goal is to use your 3 hunters to trap the bear, it’s a variant of the ancient Bear games.
The main way to do this is to prevent the bear from lurking in the centre, and “surrounding” it from 3 sides with your hunters. This requires planning a move or two ahead.
Whilst this game’s techniques can be learned with practice, the first few times can be confusing. The difficulty ramps up whilst completing the 5 rounds for a quest. Luckily, @micksnips2 on Discord wrote an excellent guide (with images) for Round 5 for both sighted and Voiceover users: Bear game guide.
13. What is Community? Mentoring? Buildings?
Whilst the in-game guide provides some information, community can be a little hard to get your head around. It’s essentially 3 almost unrelated skills combined into 1:
- Buildings: Use resources to construct buildings that give useful perks like increased mining speed. The first level of the Town Hall lets you also earn free daily building progress.
- Mentoring: Train skills by helping NPCs. Your equipment and any boosts will be applied, you will keep the items, but you will earn Community XP instead. The percentage refers to how much of the normal XP your NPC will earn, this will change as they get more experienced.
- Community events: Long running extremely high XP actions with absurdly high cooldowns.
14. Is there prestiging?
Yes! Once you have all 99s you can “Start a Legacy”, whereby you specialize, pick perks, and begin the game again (whilst keeping your pets).
I haven’t done this yet, as I’m enjoying my fully complete game!
15. How does the house storage work?
Your house can contain generic bags and specialised boxes. Preparing these can be a little tricky, you need to long press one of your equipped bags / boxes then tap a house space. You can then equip another bag / box.
Once your house has storage, you can tap a bag / box to view the items within. From there, the items can be dragged between storage areas.
16. What are the empty squares on the trader picker?
Traders have rare items that will only appear sometimes. These might be saws for cutting planks faster, fishing boots, etc. Once you have purchased the item it will permanently appear on the trader selection screen.
Note that these items are almost all extremely powerful.
Other
17. What is the quest requirement with 10x man?
You need to kill Jeffrey in “The Four Hatsmen” combat area 10 times.
18. What is the quest requirement with 3x green monster?
You need to kill Forest Kin in “The Shimmering Cave” combat area 3 times.
19. How do I get more inventory space?
The easiest way is to clear up your current space. Cook all raw fish, use up potion ingredients, sell junk.
If this still doesn’t help, you need to craft generic bags from leather (dropped by monsters) via the Crafting skill. Additionally, you can make use of specialised boxes (such as food only, rings only, etc) from the Carpentry skill.
20. How can I kill Arborion in under 12 seconds?
Maximise your attack and strength, and use as many potions as possible. Note that different tiers of potion “stack”, and you can bring across your attack bonus from the “Spice Lover” enchant for a truly ridiculous attack level.
Using Water & Lightning tomes throughout helps (as well as the ring that doubles critical hit damage).
However, even with all these bonuses, you still need to be lucky. With this setup, I was getting times of 10-25 seconds depending on the hits.
Tips
Whilst my previous post contained 12 tips, a few weeks later I’ve learned plenty more!
General
21. Join the Discord!
Idle Iktah’s Discord server is the place to go for advice and discussion.
Whilst the subreddit r/IdleIktah is OK, it’s far quieter than the Discord.
22. Everything helps everything.
Almost every skill links in to the others. For example, if you’re struggling to kill a high level enemy you could…
- Train mining & smithing for better armour.
- Fight lower level enemies to level up / obtain rare equipment.
- Use Alchemy to create better potions.
- Use Enchanting to get more powerful enchants on your items.
- Fish and cook better food so you don’t run out as quickly.
- Use Crafting to make rings with better stats.
As such, it’s probably not a good idea to specialise in 1-2 skills. Instead, levelling everything roughly equally ensures you won’t “block” yourself out of content by not having all the items you need.
I trained roughly in batches of 10 until I had all 90+, then grinded the last few levels however I could. This ensured I always had the wood / metal / gathered items etc for the best equipment.
23. Schedule sensibly.
Early on, it makes sense to run resource gathering tasks overnight, since they will never “run out”. Later on however, when you’re working in bulk you’ll have 8-9 hour tasks that need doing (such as plank making).
Doing these overnight where possible makes sense, since it leaves the day free for shorter tasks that need more interaction.
24. Always be boosting levels, speed, and XP
Higher level abilities in most skills reward drastically more XP. As such, it’s usually a good idea to create a hundred or so potions to boost a skill, then use them to access the better area. For resource gathering skills, the higher level area can offer 4-5x as much XP, and provide better resources too!
Similarly, you should avoid saving potions unnecessarily. It’s fine to use up Mastery potions on any skill you want, even if it’s not technically the most efficient use.
25. Traders are overpowered
Traders, once they have one of the dugouts, can be amazing!
They let you skip ahead multiple levels, and it can often be more efficient to buy a higher level item (if it’s cheap & slow to make) than wasting time making it yourself. Creating the high level dugouts to improve the quality and quantity of their offerings is an excellent use of resources.
A good example of this is “Ancient Coins”, which can be obtained from any of the resource gathering skills or purchased fairly cheaply (200 rare shells) in Qwintif the trader’s shop.
Finally, the potion trader is absolutely crucial for end-game completion. As he sells Mastery potions, -10% & -50% time non-combat skill potions, and even the highest level combat potions, you’ll be spending a lot of rare shells here. For the last week or so of gameplay, all of my dugout trader selecting was used on him.
26. 99 enchanting indirectly helps rare shells
Once you have 99 enchanting, there’s no reason to keep disenchanting items. As such, doing this as early as possible lets you sell all your leftover resources.
For me, I ended up having 30-40k rare shells, far more than I could ever spend. This was despite spending thousands per day on expensive potions.
27. Optimise your loadouts
Use equipment loadouts! Royal equipment will save you days in the long term, and the ability to quickly access the most time-saving equipment for each skill will help.
This can be somewhat awkward with the “Giga Glove”, as I struggle to remember the 4 skills it boosts: Woodcutting, Mining, Crafting, Smithing.
Here’s the loadouts I used for most of the game, I generally would have to double check whether Royal Gloves or Giga Glove were better though.
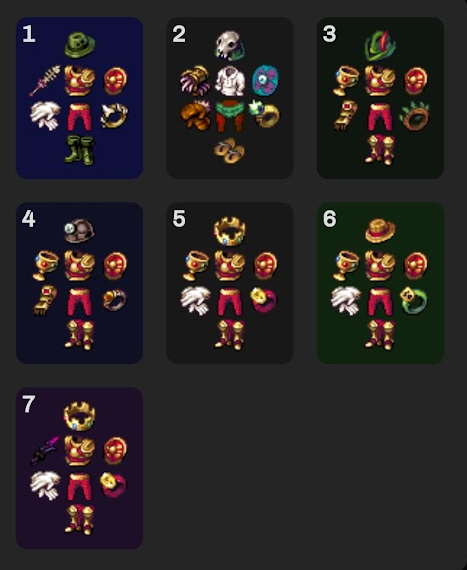
- Fishing outfit, -25% time (and double fish due to weapon).
- Combat outfit, see equipment & enchants info.
- Woodcutting outfit, -28% time.
- Mining outfit, -28% time.
- General skilling outfit, -18% time.
- Gathering outfit, -24% time.
- Alchemy outfit, -20% time.
As you can see, every non-combat skill is being trained around 20% faster than default, hence why Royal equipment is so crucial. Note that I am still missing a couple of the rarer drops, so these outfits are not optimal!
Skills
28. Combat: Save food for rare item drops
Whilst smithed armour is OK, rare item drops from enemies will usually be better. Save up cooked food for these, and actively monitor the game whilst fighting way-too-hard enemies so you can leave as soon as you get the drop.
29. Combat: You need to boost your chances
In additions to drinking as many stat boosting potions as possible (remembering that different tiers can be stacked), make sure you also use Headhunter Potion (rare enemies 10x more common), Prospector’s Potion (rare drops 2x more common), as well as the Prospector’s Perception enchant if available.
Using as many of these as possible will make any rare item grind pretty quick.
30. Combat: Grind in The Hidden Grove
I used The Hidden Grove combat area (enemies level 58-70) from around level 60 combat stats to 99, and it was great throughout.
The enemies are relatively weak, but they also have a few characteristics that make this area especially good for levelling up:
- They have forest boost. If you remove the forest enchant from your shield, the enemies will all have 2x health. This means more time spent in combat, so more XP/hour.
- They drop some spices (Blueberry, Truffle, Blackberry), which will give you extra attack if you have the Spice Lover helmet enchant.
- They drop Woodland Art, which sell for quite a lot to traders (0.6 each).
31. Woodcutting
Woodcutting is a straightforward skill, just make sure you are always on the highest wood possible as the XP speed increases drastically.
I recommend hanging on to the “Massive Logs” you get as a rare drop, as they provide extremely high Carpentry XP later on.
32. Mining
Mining is also very easy to level, just mine as high level ore as you can. Similar to Woodcutting, make sure to save all your gems as they can all be used for crazy amounts of Crafting XP as rings. Jade should be saved for the end-game though, as the best tools use them.
33. Fishing
Whilst Fishing is simple, you can improve your XP per hour by using a “Potion of Choice” to choose which fish to catch. The higher level fish (bottom of the list of 3) will always provide slightly more XP, and heal more.
The Town Weir in Community should also be used when possible, as the quick XP there is useful at all levels, and the Oolichan fish are useful for making Oil.
34. Gathering
As with Fishing, a Potion of Choice will help improve your XP per hour. However, you may also want to consider prioriting potion ingredients over spices, as Cooking is generally easier to train than Alchemy.
35. Crafting
Make rings! Using up gems from Mining in rings can be very fast XP, especially with XP doubled.
For longer training sessions however, I recommend making pickaxes. The full process of creating a pickaxe will provide great Woodcutting, Mining, Smithing, and Crafting XP. It’s worth trying to use Mastery potion for the pickaxe creation step, otherwise Smithing will get too far ahead (due to bar & pickaxe head XP). The finished pickaxes sell for a lot to traders.
This skill is worth training early for the larger bags that can be created.
36. Smithing
Making yourself a full suit of as high level armour as possible is an obvious use of Smithing, but it’s amazing how many people are in high level combat zones with random pieces of weak armour leftover! Make sure you’re using decent armour at all times.
I levelled this up by making thousands of pickaxe heads of each tier, I believe it is the best way due to the synergy with Crafting.
37. Cooking
Cook fish! That’s all there is to it, higher level fish provide better XP and more healing, so it just takes time.
Spices are worth using up, especially if you’ve managed to gather lots of Truffle (-80% time!) from combat or Gathering.
38. Alchemy: You don’t need to use up everything
It can be tempting to use up every ingredient you have, but sometimes it’s really not worth it. For example I did a lot of Fishing early on, so had thousands of shells and seaweed. However a fishing potion only earns 15xp, and takes 4.5 seconds, so really isn’t worth the time.
39. Alchemy: Prioritise useful potions
There’s no point making a potion that gives slightly more XP than another potion if you’re just going to sell it. Instead, try and create combat potions, Oil, Powpow Tea (-10% time), or potions that let you access a higher XP method in another skill.
That being said, you’ll be creating a lot of potions. I created thoudsands of Headhunter Potions for quite good XP, and Major Attack Potions for use in enchanting. This can be a tricky skill to level up in bulk.
Other members on the Discord recommend using Seeker’s Potions whilst Woodcutting Cedar trees, and obtain large quantities of Pine Knots. These can then be used to create large quantites of oil, useful for both fast Alchemy XP and fast training of other skills (via lanterns).
40. Carpentry
Make boxes! Although creating the planks and bars can take a while (although both are OK XP by themselves), creating storage boxes can be some of the highest XP in the game. In addition, they are useful for inventory management.
Towards the end of the game, I created 20k Elderwood Boards and 10k Klynite Bars then bulk created a staggering 2k Elderwood Wardrobes. Combined with Mastery potions, this gave me 5,000,000 Carpentry XP in just over 4 hours.
Creating Dugouts can also be great XP if you have leftover Massive Logs from Woodcutting.
41. Enchanting: Obtaining cores
This might be the hardest skill to level. I really struggled getting going with this skill, and it was my lowest non-combat skill for a long time.
The only real approach to getting cores is bulk disenchanting valuable items like crafted pickaxes (if you don’t need rare shells), leftover monster drops, and excess supplies from resource gathering. You’ll need tens of thousands of cores, and as they are the bottleneck you should usually be making the highest level enchant possible for maximum XP per core.
42. Enchanting: What to enchant
As you get to higher Enchanting levels, golems are by far the easiest way to train and provide the best XP per core too. A single Elder Golem token provides 800xp in just 15 seconds (unboosted), and only requires 20 Strong Cores and an Elderwood Ring. This will be where most of your XP comes from.
43. Community
The most confusing skill.
At lower-mid levels, creating “Events” will be absurd XP, with the final one offering 720,000 XP (when doubled)! However, due to the long cooldowns these aren’t as helpful later on.
I ended up levelling most of my other skills first, then just mentoring the skills I no longer needed XP in overnight. Whilst mentoring, your equipment bonuses and potions etc still apply, so it can be pretty good XP once you have Royal equipment.
Guides
All unique equipment drops
A lot of the best equipment for skilling or combat is obtained as rare drops from unique enemies. Here’s where they all come from, the best items are highlighted in bold.
Main combat zones:
- Business Hat: Jeffrey in “The Four Hatsmen”.
- Fedora of Friendship: Charles in “The Four Hatsmen”.
- Chapeau of Chivalry: Derrick in “The Four Hatsmen”.
- Mercurial Cap: Marcellus in “The Four Hatsmen”.
- Rose Tinted Glasses: Any enemy in “The Four Hatsmen”.
- Orc Axe: Orc Leader in “Orc Hideout”.
- Bandit’s Cap: Any enemy in “Bandit Camp”.
- Shadow Dagger: Shadow Thief in “Bandit Camp”.
- Bossen Blouse: Captain Drake or Mate Diego in “Pirate Cove”.
- Alchemist’s Mask: Tamah Shaman in “Tamah Tribesmen”.
- Knight’s Armour: Any enemy in “The Forgotten Church”.
- Mountain Mitts: Soul Keeper in “The Forgotten Church”.
- Miner’s Band: Captain Redfist in “The High Council”.
- King’s Klaws High Councilor in “The High Council” (dropped in 2 parts).
- Death’s Deputy: Kopiaklahs in “The Throne Room”.
Special combat zones:
- Ocean Gloves: Azurite Golem in “Conjured Combat”.
- Forest Boots: Maple Golem in “Conjured Combat”.
- Trail Legs: Basalt Golem in “Conjured Combat”.
- Timber Tights: Elder Golem in “Conjured Combat”.
- Shield of Foresight: Any enemy in “The Reflected Realm”.
- Mirrored Mask: Evaluator in “The Reflected Realm”.
- Saltblade: Krakalaken in “Deep Water”.
Expedition’s Echo guide
The Expedition’s Echo minigame is unlocked by using the Wavesong Key, dropped by Captain Izzy in “Expedition’s End” combat zone.
In this minigame, you essentially enter a temporary time-limited new game, with all your unlocked training methods from the main game. After a few minutes you enter waves of combat, and must survive as long as you can.
I don’t recommend trying this minigame much until you have level 80-90+ skills, otherwise you’ll earn points more slowly due to fewer skill options available.
First few runs
Until you have unlocked the maximum 10 perk points (200 each), your runs won’t be optimal. Unlocking these perks should be top priority, as the Rusty Lockbox rewards can be grinded later on.
Unlocking all perk points won’t take more than an hour or so, feel free to add the perks in any order you want.
Perks
I really struggled getting a decent run until I found out how useful “Armored Advantage” is, letting you skip most of the mining and smithing.
Here’s the 10 perks I use:
- Swift Strikes: 15% faster attack speed, for faster kills using less food.
- 2x Private Chef: Start with 40 truffle, for very quick cooking.
- Scout Master: +1 minute for preparation.
- Botanical Bounty: Better potion drops, to let you kill harder enemies.
- Basic Bundle: Coho, Ginger, Logs, Klynite bar, letting you save lots of time and complexity during preparation time.
- 2x Armored Advantage: Full basalt armour, ensuring I can survive pretty well even without preparing anything.
- Double Dip: 50% chance of double fish drops, making the food gathering much quicker. I believe this also applies to enemy drops.
- Picky Plundering: Remove equipment drops from enemies, since we already have full basalt so food is more useful.
My approach
The goal of the prep time is to improve equipment a bit, but primarily to gather as much cooked food as possible. As such, here’s what I do:
- Gather 1 Grasshopper from Mukra Meadow.
- Gather 1 Hazelnut from Nica’s Clearing.
- Combine these into a Cooking Potion in Alchemy.
- Disenchant the 10 Coho provided, to obtain 10 Normal Cores and 10 Weak Cores.
- Create the Spice Lover enchant using Normal Cores and Ginger.
- Create the Cooked Food enchant using Weak Cores and Cooking Potion.
- Mine 2 Klynite ores.
- Smith 2 Klynite bars.
- Use these 2 Klynite bars plus the free one to smith a Klynite Sword.
- Cut 2 Elderwood Logs.
- Craft 1 of these Elderwood Logs into an Elderwood Ring.
- Go to the Community Town Weir, and start Fishing for the next couple of minutes.
- Whilst this happens, apply your 2 enchants, and equip your sword and ring.
- Wait until you have around 1:10 left, then Cook all your Chinooks using Truffles.
- Either cook your Coho, or try and fish more Chinooks to cook before running out of time.
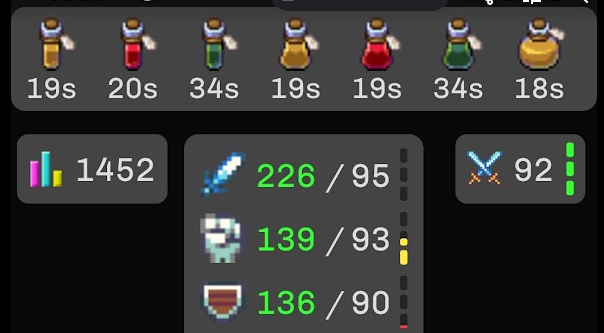
By the end of this run, I have:
- Full basalt, with Spice Lover helm, Cooked Food gloves, Klynite sword, and Elderwood Ring.
- ~25 cooked Chinooks, and some other lower level food.
This is a pretty good setup! Here’s how it looks:

General tips
- If you get lucky and find a rare drop during prep time, you can sell this to a trader and buy potions etc. This can be done even after prep time ends.
- If you get even luckier and save your bars whilst smithing the Klynite sword, don’t forget to upgrade your helmet or boots.
- Save the potions you earn during the first few waves, there’s no point using them until stage 5 or 6.
- The last enemy shows up at stage 8, with stage 9 just repeating the same enemies. I’ve made it to 9-3 using the approach above.
- You will get around 1200-1800 points per run, enough for plenty of Rusty Boxes.
100% completion checklist
So you’ve put a few weeks into the game, and you’re getting close to running out of content. How do you know when you’re “done”?
Well, here’s what I consider 100% completion:
| Difficulty | Achievement | Description |
|---|---|---|
| Easy | 1485 Total level | 15 skills, 99 levels = 1485 total levels. |
| Easy | All rare monster drops | Every combat zone’s rarest enemy’s rarest drop. |
| Easy | All Aborion speedrun rewards | Boreal Ring, Gloam Duster, Arborbiter. |
| Easy | Maxed out house | Elderwood Lodge, Elderwood Bed, 4x Royal Table, 4x Royal Chair. |
| Easy | Full royal outfit | Royal crown, body, shield, ring, legs, boots, gloves, goblet. |
| Medium | Maxed out tools | Jade / Dream: Adze, Axe, Pickaxe, Spear. Elderwood Basket. |
| Medium | All Expedition Echo unlocks | Echo’s Embrace, Eternal Candle, Dream Pickaxe, Dead Sea Sword. |
| Hard | All pets | There are 14 pets in total |
| Impossible | Black Pearl | This is a 1/100,000 drop from shellfish, good luck! |
Whilst I’ve completed most of these, I’m still missing a few pets and not even trying to get the Black Pearl! A commenter mentioned 3 of them are needed for “full power tidekeeper”.
Conclusion
Idle Iktah is one of the best mobile games I’ve ever played, and it receives fixes and improvements every week or two. It kept me completely hooked for ~6 weeks, and is the only game I’ve written 2 articles about!
The game has also made a massive splash in the partially sighted community, thanks to the developer’s focus on ensuring the game is accessible as possible. Based on the questions and discussions on Discord, there may even be more partially sighted users than fully sighted. This attention is undoubtedly part of the reason behind the game’s rapid growth, and I really hope it continues.
If anything here seems incorrect, or you have additional tips, leave a comment or suggest a change directly.
Thanks, and enjoy Idle Iktah!